|
|
Frequently asked questions regarding BLS website data retrieval tools
To print data on one page:
- On the File menu, click Print.
- Click “Preference” or “Properties” button.
- Click “Advanced”tab or button.
- Select Graphic, then Scaling.
- Enter 80% or less in the “Scaling” box.
- Click the “OK” button.
- Click “OK“ button again.
- Click the “Print” button.
(Note: These instructions may not support all printers due to manufacturer-specific preferences that vary among print devices.)
To save output to a disk:
- On the File menu, click Save Page As File.
- Double click the folder/directory you want to save the page.
- In the File Name box, type a name for the page.
- Select Web page, complete from the Save as type drop-down menu.
- Click the “Save” button.
To retrieve data for a single period/month:
- After you retrieve the data,
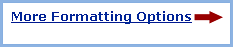
- Click the More Formatting options link at the top on the
right-hand side of the data screen.
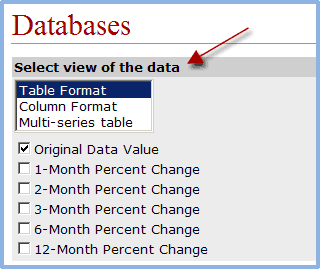
- Select a format option for which to view the data, e.g., Table format.
- Select one time period, e.g., January, under “Select the time frame for your data“.
- Select one of the listed options, e.g., HTML, under “Output Type”.
- Click the “Retrieve Data” button.
To retrieve data for a single year:
- After you retrieve the data,
- Click the More Formatting options link at the top on the right-hand side of the data screen.
- Select a format option for which to view the data, e.g., Table format.
- Select “Specify year range” in the drop-down menu under “Select the time frame for your data”.
For example, enter 1994-1994, to get data for 1994.
- Select “All Time Periods”.
- Select one of the listed options, e.g., HTML, under “Output Type”.
- Click the “Retrieve Data” button.
To retrieve the Annual Average:
- After you retrieve the data,
- Click the More Formatting options link at the top on the right-hand side of the data screen.
- Select a format option for which to view the data, e.g., Table format.
- Select “All years” or “Specify year range”, then select Annual Data, under “Select the time frame for your data” .
- Select one of the listed options, e.g., HTML, under “Output Type”.
- Click the “Retrieve Data” button.
Note: This feature does not apply to all databases. Data must be available for the periods selected, otherwise an error message will display, e.g., No Data.
To calculate NET Change:
Calculates and displays NET CHANGE for a series for selected discrete periods or 1 year.
- Retrieve your data using any BLS data retrieval tool, e.g., the Series
Report tool.
(By default, the tool retrieves the last ten (10) years up to the current period.)
- Click the "Next" button.
- For Net Change, select the view for your data, e.g., “1 Month Net Change,”
“3 Months Net Change,” or “12 months Net Change” for the entire year.
- Select a time for your data, e.g., All Time Periods.(Optional)
- Specify the year range, if it is something other than the default, or select one time period, e.g., June.(Optional)
- Click the "include graph" checkbox (you must select at least two years).(Optional)
- Select one of the other output items, e.g., HTML Tables, if you desire.
- Click the "Retrieve Data" button.
Note: This feature does not apply to all surveys.
To calculate PERCENT Change:
Calculates and displays PERCENT CHANGE for a series for selected discrete periods or 1 year.
- Retrieve your data using any BLS data retrieval tool, e.g., the Top Picks tool.
(By default, the tool retrieves the last ten (10) years up to the current period.)
- Click the "Retrieve Data" button.
- Click on the “More Formatting Options” link.
- For Percent Change, select the view for your data, e.g., “1 Month Percent Change,”
“3 Months Percent Change,” or “12 months Percent Change” for the entire year.
- Select a time for your data, e.g., All Time Periods.(Optional)
- Specify the year range, if it is something other than the default, or select one time period, e.g., June.(Optional)
- Click the “include graph” checkbox (you must select at least two years).(Optional)
- Select one of the other output items, e.g., HTML Tables, if you desire.
- Click the “Retrieve Data” button.
(Note: This feature does not apply to all surveys.)
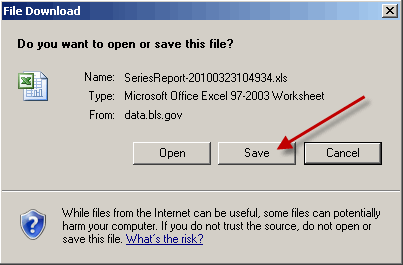
To save your query to an Excel worksheet:
- After you retrieve the data,
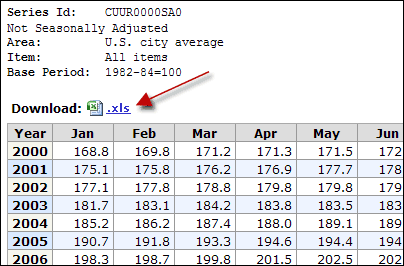
- Click on the ".xls" link at the top left-hand side of the output table.
- Click on the "Save" button.
For Additional Formatting:
- Retrieve your data using one of the many BLS data retrieval tools.
- Click the "More Formatting options" link near the top on the
right-hand side of the output page.
- Select any one of the choices to view your data on the Formatting Options page.
- Select HTML table under Output Type.
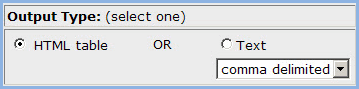
(Note: This option is NOT supported for Text Output Types - Comma or Tab Delimited)
- Click the "Retrieve Data" button.
- Click on the ".xls" link at the top left-hand side of the output table..
- Click on the "Save" button.
Last Modified Date: April 30, 2010
|
